Google Consent Mode Integration with UniConsent CMP
- Google Consent Mode Integration with UniConsent CMP
- How to setup Basic Consent Mode and Advanced Consent Mode v2
- How to create a Cookie Banner with UniConsent for Google Consent Mode
- How to setup Consent Mode for Google tag (gtag.js) with UniConsent
- How to setup Consent Mode for Google Tag Manager with UniConsent
Before you get started, you need to sign up for UniConsent and obtain a license ID for your website or app.
Google Consent Mode is an API that allows you to send anonymous event data to Google Ads, Campaign Manager, Display & Video 360, Search Ads 360, and Google Analytics.
If you don't have consent mode v2 implemented, you won't have the option to remarket/personalize ads to these audiences in the future. To retain measurement for these audiences, you should implement consent mode V2 by the end of 2024 for EEA users.
UniConsent seamlessly integrates with Google Consent Mode. There is no need for any special configuration to enable this integration, as long as you have installed UniConsent CMP tags on your web pages either manually or via the Google Tag Manager. You can turn this off at your CMP dashboard if you don't use Consent Mode.
You can find instructions about how to install UniConsent via Google Tag Manager at https://www.uniconsent.com/docs/tutorials/gtm-integration.
Use the Google-recommended consent message
You can use the Google-recommended consent message if you only use Consent Mode but not the IAB TCF/IAB GPP API.
We use cookies to provide you with the best possible experience. They also allow us to analyze user behavior in order to constantly improve the website for you. <a class="font-bold underline cursor-pointer" href="https://business.safety.google/privacy/">Privacy Policy</a>
Google Consent Mode V2 Manual Setup
Node: You must implement the following default consent status script to make Google Consent Mode V2 work if not using Google Tag Manager.
Place the following tag just before the UniConsent CMP tag and before your Google tags or any other advertising tags:
<script>
(function() {
    if(!window['gtag']) {
        window['dataLayer'] = window['dataLayer'] || [];
        window['gtag'] = function(){window['dataLayer'].push(arguments);}
    }
    window['gtag']('set', 'developer_id.dZTcxZD', true);
    window['gtag']('consent', 'default', {
        ad_storage: 'denied',
        functionality_storage: 'denied',
        personalization_storage: 'denied',
        analytics_storage: 'denied',
        ad_user_data: 'denied',
        ad_personalization: 'denied',
        security_storage: 'granted',
        wait_for_update: 1000
    });
    window['gtag']("set", "ads_data_redaction", true);
    window['gtag']("set", "url_passthrough", false);
})();
</script>
or use the short tag:
<script src="https://cmp.uniconsent.com/v2/stubgcm.min.js"></script>
The above code delays all the Google tag cookies until the user grants consent, except for security_storage.
You can update the values of ads_data_redaction and url_passthrough based on your requirements.
Note: If you set url_passthrough to true, Google tags will append _gl or _ga IDs to your URLs and pass data via the URLs. If you don't want GA4 to modify your URLs and append _gl parameters, you can set it to false.
If some of the options are not required by default in your country, you can change the value to be granted. For example:
<script>
  window.dataLayer = window.dataLayer || []
  function gtag() {
    dataLayer.push(arguments)
  }
  gtag('consent', 'default', {
    functionality_storage: 'granted',
    security_storage: 'granted'
  })
</script>
If Google Tag Manager is already set up on your website, ensure that you place the GTM script after the Default Consent Mode Script.
Setup Google Consent Mode V2 via Google Tag Manager
If Google Tag Manager isn't set up on your website, follow the steps below:
- Register/Establish a Google Tag Manager Account and create a container.
- Go to the Google Tag Manager Dashboard and select the Container ID from the top navigation panel.
- Insert the GTM script between the custom script and the UniConsent tag. Also, remember to add the
<noscript>element right after opening the<body>tag.
Then follow the instructions at https://www.uniconsent.com/docs/tutorials/gtm-integration to setup UniConsent CMP via Google Tag Manager.
Google Consent Mode Consent Type Mapping
| Google consent type | UniConsent Simple Mode consent type | Purpose |
|---|---|---|
| ad_storage | Targeting and Advertising | To enable advertisement cookies. |
| analytics_storage | Performance | To enable analytics cookies. |
| functionality_storage | Functionality | To enable functional cookies for website functionality and settings. |
| personalization_storage | Functionality | To enable functional cookies for user personalization. |
| security_storage | Strictly Necessary | To enable necessary cookies for website security and protection, user UI preferences, etc. Such cookies do not require consent. |
| ad_user_data | Targeting and Advertising | To enable advertisement cookies to set consent for sending personal data to Google core platform service. |
| ad_personalization | Targeting and Advertising | To enable advertisement cookies to use data for ad personalization such as remarketing. |
Google Consent Mode Consent Type Mapping with IAB TCF
| Purpose | Description | Google tag behavior when Purpose is denied |
|---|---|---|
| Store and/or access information on a device | ad_storage = denied | ad_storage = denied ad_user_data = denied |
| Create a personalised ads profile | ad_personalization = denied | ad_personalization = denied |
| Select personalized ads | ad_personalization = denied | ad_personalization = denied |
| Measure ad performance | ad_user_data = denied | Disables the Google signals feature in Google Analytics (for web tags only). |
| Apply market research to generate audience insights | Disables the Google signals feature in Google Analytics (for web tags only). | |
| Develop and improve products | Disables the Google signals feature in Google Analytics (for web tags only). |
How to confirm UniConsent CMP for Google Consent Mode is working on your site?
1. Use Google Tag Assistant
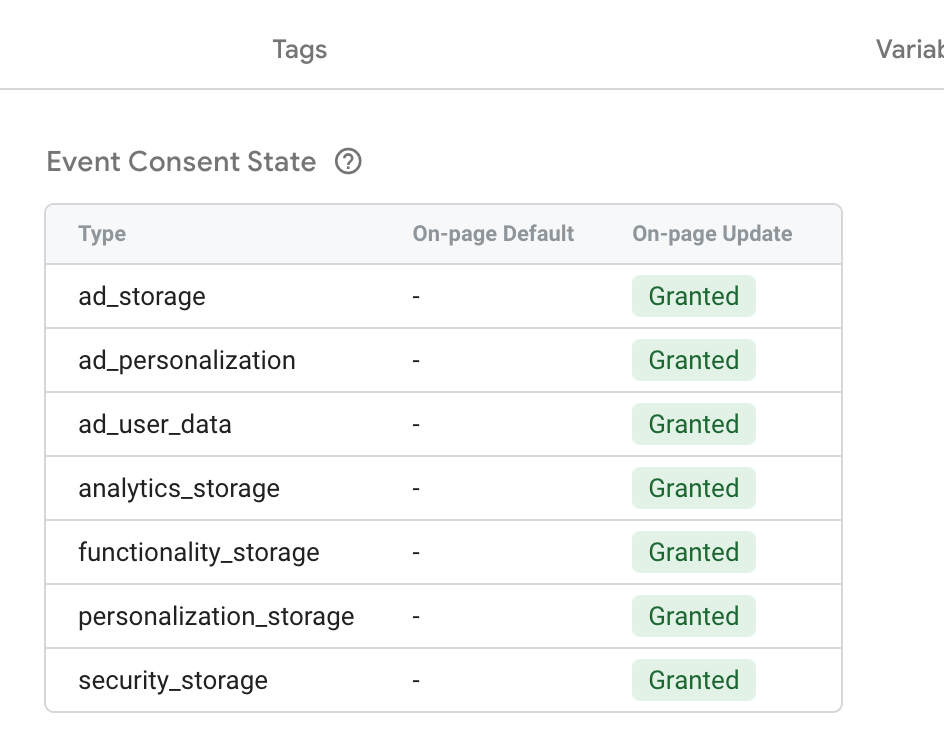
Find Consent at the left side and click, then click Consent tab at right side. You should see something like the following:
 How to confirm UniConsent CMP for Google Consent Mode is working
2. Verify Consent Mode is working with developer console in browser
You should not see any warning messages in your developer console in browser from UniConsent CMP.
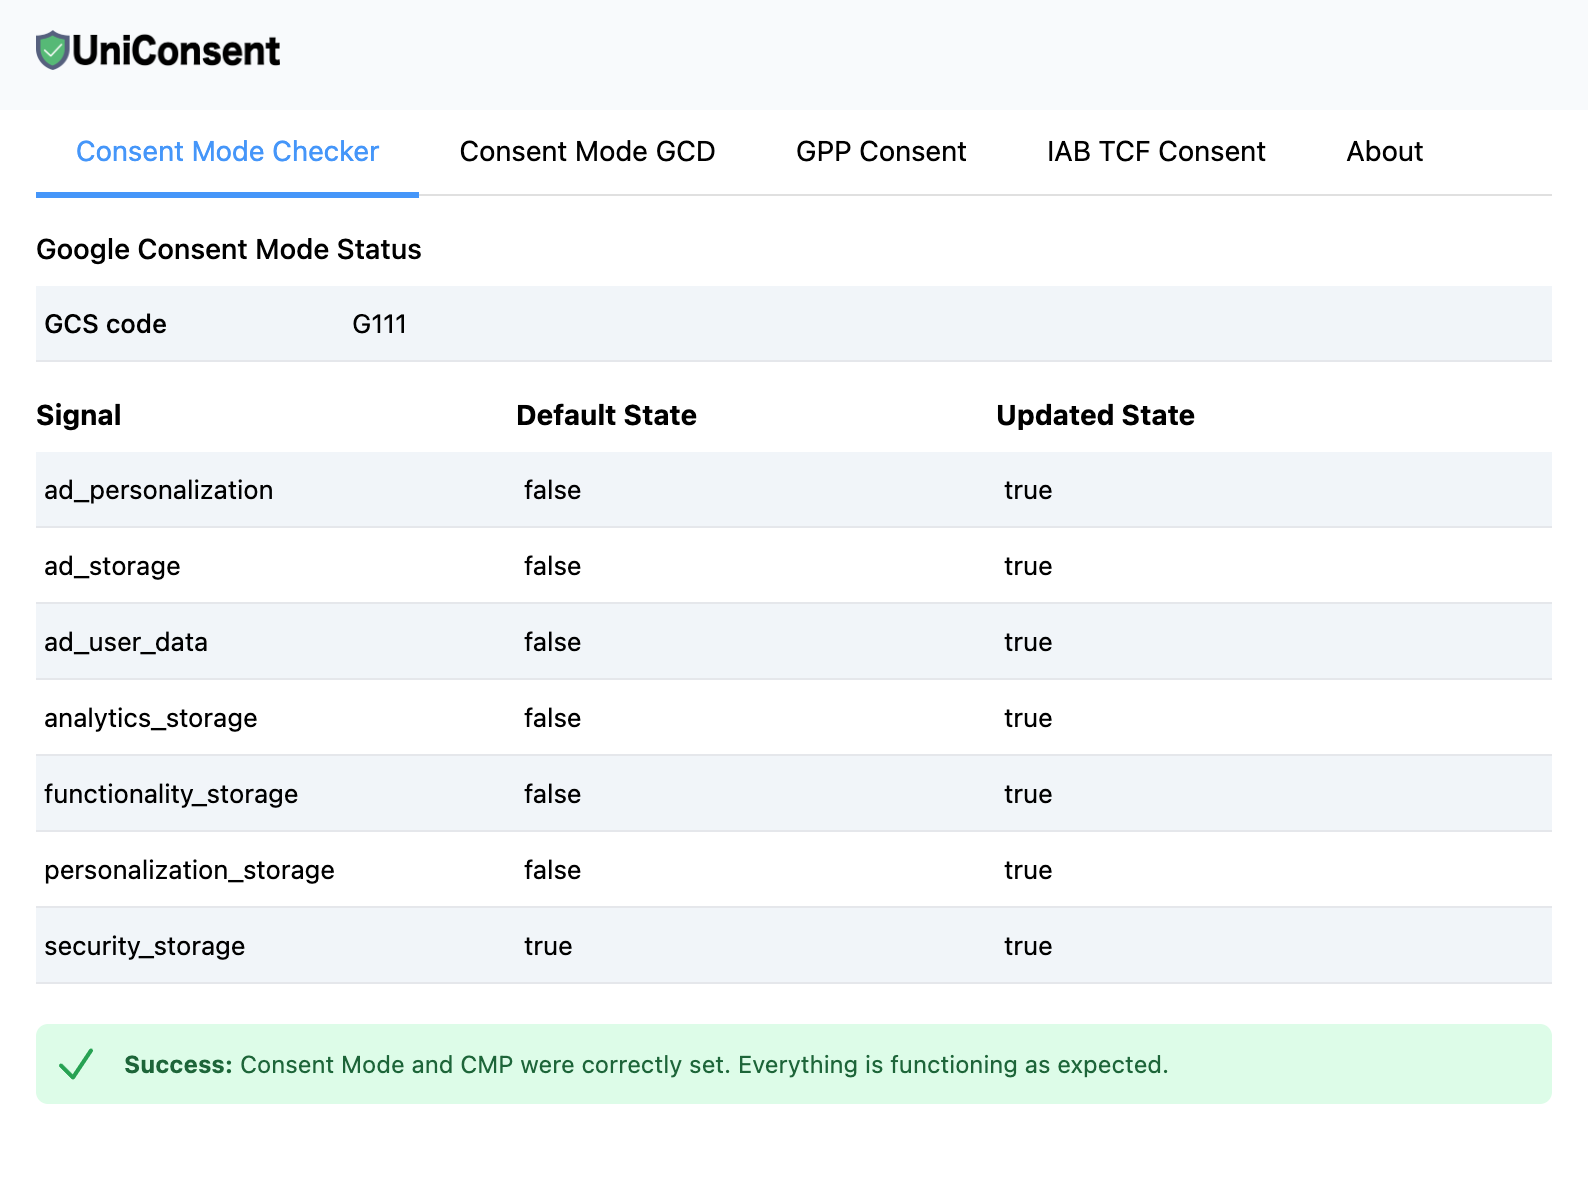
3. Verify Consent Mode is working with UniConsent Consent Validator
You can install UniConsent Consent Validator to verify Consent Mode data is passing on your webpages.
 Verify Consent Mode is working with UniConsent Consent Validator
4. Use DataLayer API:
Enter window.dataLayer = window.dataLayer || []; into console of your browser, you should find a section consent, update.
{
    "0": "consent",
    "1": "update",
    "2": {
        "ad_storage": "granted",
        "ad_user_data": "granted",
        "analytics_storage": "granted",
        "functionality_storage": "granted",
        "personalization_storage": "granted",
        "ad_personalization": "granted",
        "security_storage": "granted"
    }
}
5. Access Google Consent Mode Data via Javascript API
You can use the following Javascript API to access the Google Consent Mode Data:
(function waitCMP() {
  var readyCMP
  if (!readyCMP && window['dataLayer']) {
    window['dataLayer'].forEach(function (event) {
      if (event['event'] === 'unic_data') {
        readyCMP = 1
        console.log(event['CONSENT_MODE'])
      }
    })
  }
  if (!readyCMP) {
    setTimeout(waitCMP, 100)
  }
})()
Common Errors When Implementing Google Consent Mode, IAB TCF, or GPP:
-
Google Consent Mode Enabled, but Default Status Stub Code is Missing
Issue: You might encounter an error message in the Validator or developer console:
Error: Consent Mode Default Status is not added.
Solution: Add the Default Status stub code at the top of your pages to resolve this issue. You can follow the instructions here: Consent Mode Default Status Tag Installation.
-
Google Consent Mode Enabled, but Default Status Stub Code is Added After Google Tags
Issue: If the Default Status stub code is added after your Google tags, you may see the following error message in the Validator or developer console:
Error: Your Google tags are loaded before Consent Mode Default Status and CMP.
Solution: Ensure the Default Status stub code is added at the very top of your pages, before any Google tags. Follow the guide here: Consent Mode Default Status Tag Installation.
-
Google Consent Mode Enabled via Google Tag Manager, but Not All Google Tags Are Managed in Google Tag Manager
Issue: When some Google tags are not managed in Google Tag Manager, you might see errors similar to those described above.
Solution: Either add the Default Status stub code at the top of your pages or ensure all your Google tags are managed within Google Tag Manager. Refer to the guide: Consent Mode Default Status Tag Installation.
-
IAB TCF Stub Code is Missing
Issue: The IAB TCF stub code is not included, leading to potential errors.
Solution: Add the IAB TCF stub code at the top of your pages. Follow the instructions here: Stub Codes Installation.
-
IAB GPP Stub Code is Missing
Issue: The IAB GPP stub code is missing from your implementation.
Solution: Include the IAB GPP stub code at the top of your pages. You can find the relevant guide here: Stub Codes Installation.
-
USP API Stub Code is Missing
Issue: The IAB USP stub code is not present.
Solution: To resolve this, add the IAB USP stub code at the top of your pages. Detailed instructions are available here: Stub Codes Installation.
Troubleshooting Missing Consent Mode or TCF Signals on Google Tags
When you encounter issues with missing Consent Mode or TCF (Transparency and Consent Framework) signals on your Google tags, it's essential to start the troubleshooting process with UniConsent support team rather than contacting Google directly.
If you are a Google client, please reach out to us via email at support+google@uniconsent.com or post in the UniConsent Support Community Forum. The UniConsent support team will provide a technical response within 1 business day.
Contact via Phone +441134678278 for urgent issues.
Still have questions?
Contact us: support@uniconsent.com or find livechat widget at your dashboard.